Want to play with the next Minecraft features before everyone else, without waiting for the stable release? A Minecraft snapshot server is exactly what you need. Snapshots let players, server admins, and content creators test in-development mechanics weeks (or months) before they officially drop.
In this 2026 guide, you’ll learn how to install any Minecraft snapshot on a MineStrator server, whether you’re starting from a fresh server or using an existing world. To keep things concrete, we’ll use Drop 1 2026 – Snapshot 10 (build 26.1) as an example, but the steps stay the same for every snapshot.
⚠️ Warning: Snapshots are unstable. Bugs, crashes, and even world corruption can happen. Never test on a live server without a backup.
Understand Minecraft snapshot servers in 2026
A Minecraft snapshot is a development build published by Mojang during an update cycle. It’s made for testing: you get early access to new blocks, mobs, mechanics, and technical changes, while Mojang collects feedback and bug reports before the stable release.
Snapshots are not meant for production servers. Things can change from one build to the next, and some features may be incomplete. They’re perfect for a test realm, datapack development, content creation, or simply exploring upcoming gameplay.
Snapshot naming also evolved over time. Older builds used formats like 25w34a (week 34 of 2025). In 2026, Mojang uses a clearer format like year.drop.patch, where “26.1 Snapshot 10” means the 10th test build of the first drop of 2026.
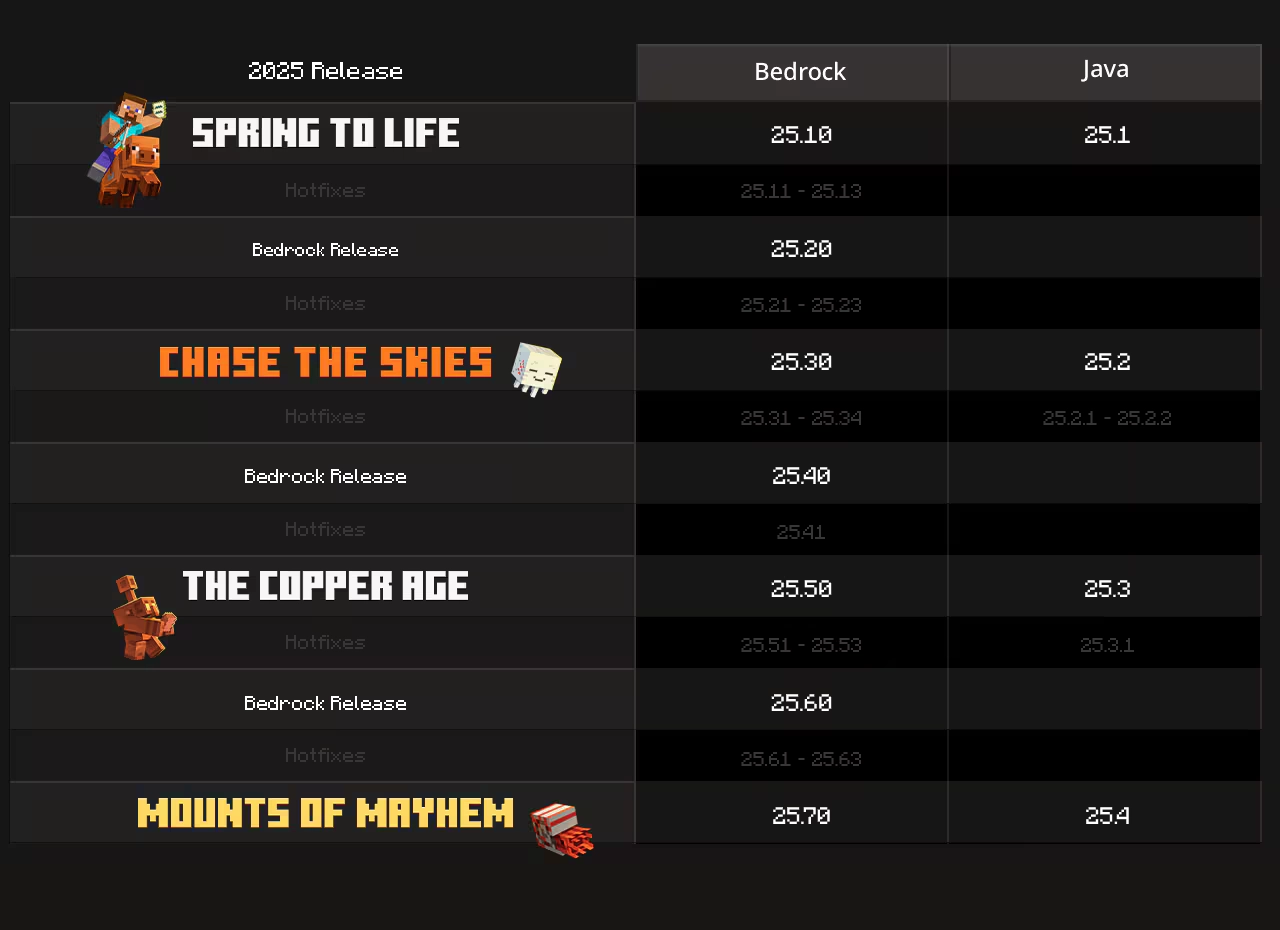
No matter the naming format, the rule is always the same: each snapshot has its own server.jar from Mojang, and your Minecraft client must run the exact same version to join.
To track new releases, check the official patch notes on the Minecraft.net articles page.
Install a snapshot on a fresh MineStrator server
The cleanest approach is to create a dedicated test server, separate from your main world. You’ll replace the default jar with the snapshot jar, then select the correct Java version. This gives you an isolated playground, with minimal risk for your “real” server.
Step 1: Create your Minecraft server
From your MineStrator client area, pick a MyBox offer and create a new Minecraft server. If you want a full walkthrough, follow this guide on creating a Minecraft server on MineStrator (2026).
Step 2: Download the snapshot server.jar
Open the official snapshot patch notes on minecraft.net. Each snapshot article includes a direct download link for the server jar.
📝 Note: For this tutorial, we use the 26.1 Snapshot 10 article and its server jar link.
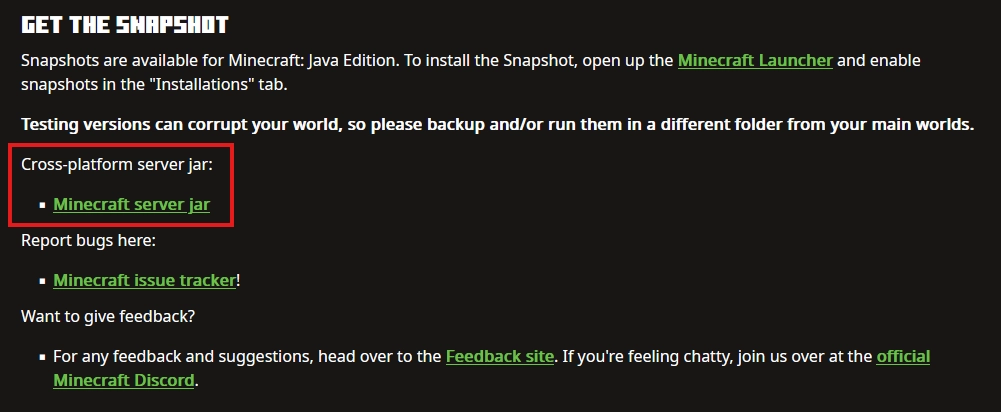
Download server.jar to your computer by clicking Minecraft server jar.
Step 3: Replace server.jar on MineStrator
In your MineStrator panel, open the Files tab. At the server root, delete the old server.jar, then upload the snapshot jar and make sure it is named server.jar.
Step 4: Select the correct Java version
This is the most common “why won’t it start?” moment. Each snapshot generation requires a specific Java version. If Java is wrong, the server won’t boot, even if your jar is correct.
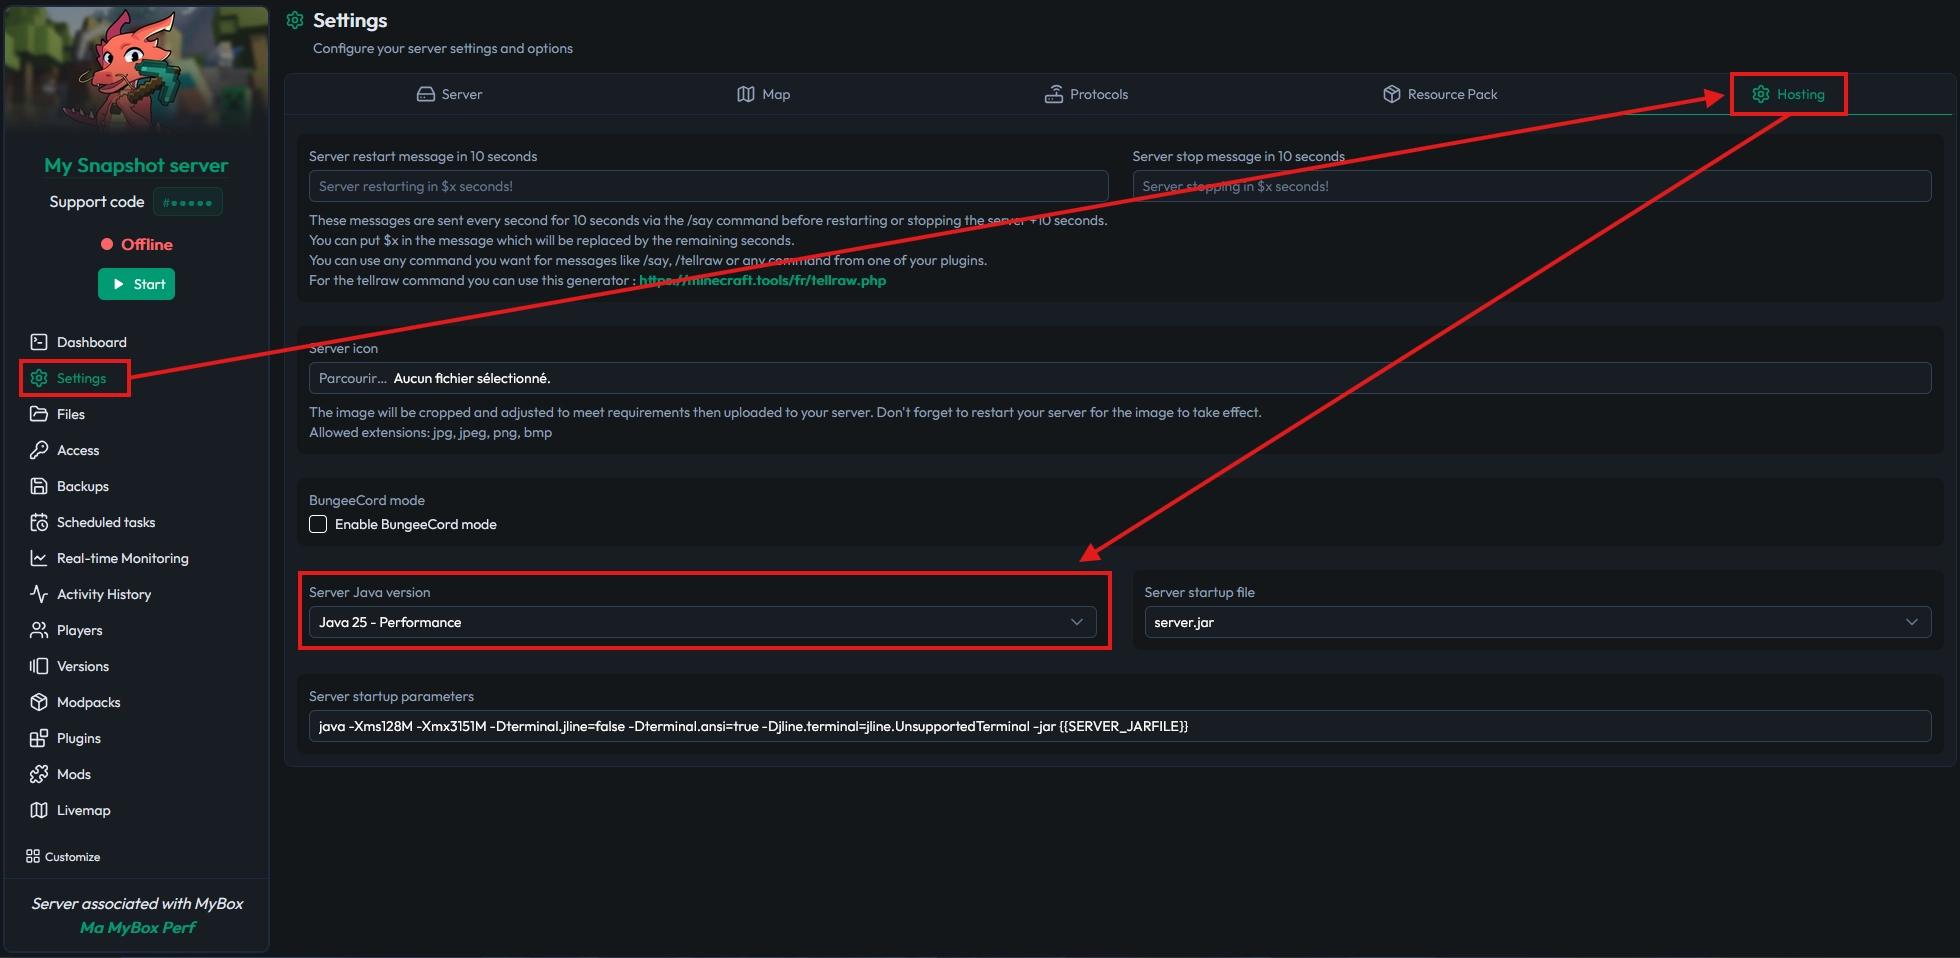
In your MineStrator panel, go to Settings → Hosting and select the Java version required by that snapshot. Always prefer the Performance build when available, and confirm the requirement in the official patch notes.
💬 Good to know: All Drop 1 2026 snapshots require Java 25, so choose “Java 25 Performance” in the panel.
Step 5: Start the server and check the console
Start your server and watch the console logs. You should see the snapshot version printed during startup, confirming the correct jar is running. If there’s no critical error, your snapshot server is ready.
If it fails to start, check these two things first: the selected Java version, and the exact jar name at the root (server.jar).
Install a snapshot on an existing world
Yes, you can test a snapshot using a world you already have, but there are two big rules. First, your server must be pure Vanilla; Spigot, Paper, Fabric, Forge, or NeoForge worlds won’t be compatible with Mojang’s snapshot server jar.
🚨 Important: Once you upgrade a world to a snapshot, rolling back to an older version is risky and can corrupt player or world data.
Step 1: Backup your server
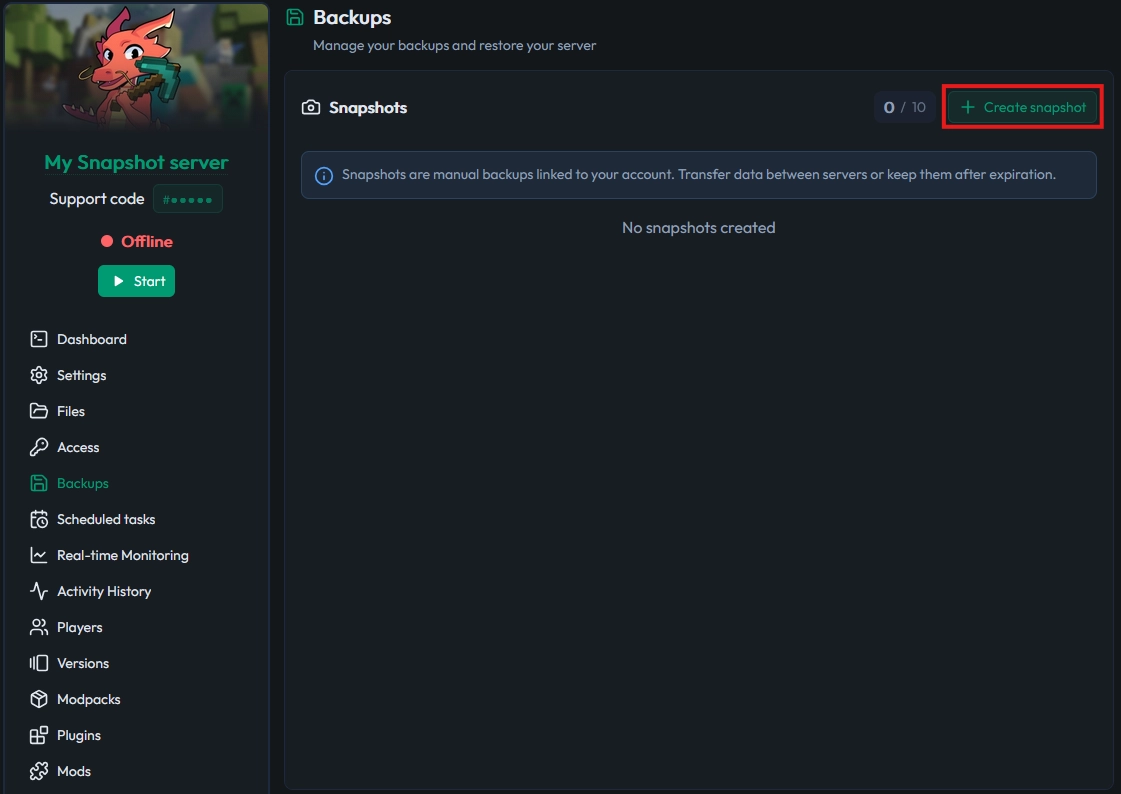
Before touching anything, create a backup in the Backups tab of your MineStrator panel. Click Create snapshot (MineStrator uses “snapshot” to mean a manual backup, not a Minecraft development build).
Step 2: Switch the server version
After your backup is safe, replace the root server.jar with the snapshot jar in the Files tab. The easiest method is drag-and-drop the downloaded server.jar directly into the file manager.
Configure your Minecraft client to join
To join a Minecraft snapshot server, your client must run the exact same snapshot version. A stable client cannot connect to a snapshot server, even if the version numbers look close. You’ll need a dedicated installation in the official launcher.
Create a snapshot installation in the launcher
Open the Minecraft Launcher and go to Installations. Enable the Snapshots filter so development versions appear in the list.
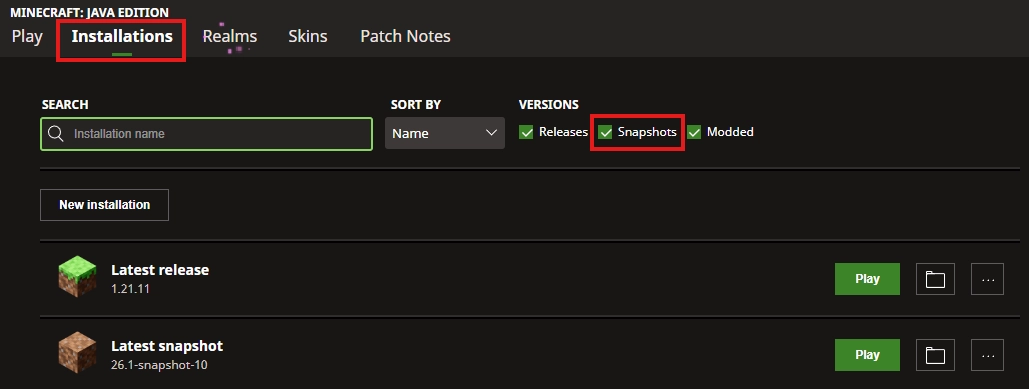
Click New installation, name it clearly (for example, “Test Snapshot 26.1”), then select the exact version matching your server from the dropdown.
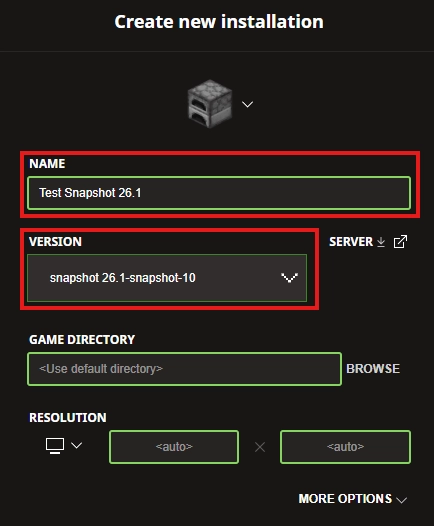
💡 Tip: Avoid “Latest snapshot”. It auto-updates to the newest build, which can desync your client from your server if a new snapshot releases.
Join the server
Launch Minecraft using that installation, go to Multiplayer, and add your MineStrator server using its usual IP and port (or your subdomain). If the versions match, the server ping turns green and you can connect.
Update your server to a newer snapshot
Mojang releases snapshots often during an update cycle. Updating your MineStrator snapshot server is straightforward:
Stop the server in the MineStrator panel.
Download the new snapshot
server.jarfrom the official patch notes.Replace the old jar in Files (keep the name
server.jar).Restart the server.
Update your client installation to the same snapshot version.
Java usually stays the same throughout one development cycle. If Mojang changes the required Java version, it will be mentioned in the patch notes.
Questions frequent
Why won’t my snapshot server start?
Most of the time, it’s the wrong Java version. Check the snapshot patch notes for the required Java, then confirm it’s selected in Settings → Hosting in your MineStrator panel.
Can I use Paper or plugins on a snapshot?
No. Paper/Spigot/Purpur target stable releases, not snapshots. For a snapshot server, you must use Mojang’s official Vanilla server.jar, and plugins won’t be compatible.
Do I need a new world for every snapshot?
Not required, but recommended. A fresh world reduces conversion time and lowers corruption risk. Also, many new features only generate in newly explored chunks.
How do I know which Java version to use?
The official snapshot patch notes on minecraft.net list technical requirements. If you’re unsure, contact MineStrator support via the support page.
Conclusion
Installing a Minecraft snapshot server on MineStrator is easy when you stick to the basics: use Vanilla only, select the correct Java version, always back up, and keep your snapshot testing separate from production. The workflow stays the same in 2026: only the server.jar (and sometimes Java) changes between builds.
Want to test new features without risking your main server? Try it free for 12 hours, no credit card required, and experiment in real conditions before the stable update lands.

 Enjoy 10% off your first month of server with MineStrator using the code ACTU10!