

Welcome to this tutorial dedicated to setting up BungeeCord.
BungeeCord is a proxy server that allows you to link multiple servers together. Its main benefit is that it prevents players from having to disconnect and reconnect when switching servers. BungeeCord is commonly used on servers offering multiple game modes or minigame servers.
Please note that this tutorial covers only a very basic installation. It does not include plugins to link servers with portals, for example—that will be part of another tutorial!
This tutorial will use the following example: setting up a PVP server and a mining map server, both connected through a HUB server, all without plugins. (This is just a theoretical example—you can of course set up as many other types of servers as you like.)
1 - Prerequisites
In this tutorial, the SFTP software used is WinSCP, and the file editing software is Sublime Text.
The first step is choosing the right hosting plans for the different servers needed for a BungeeCord setup. You need at least 3 servers (4 if you're following the example above):
The BungeeCord server: This is the core of your server network. It’s essential, as it links all your servers together. It requires few resources—a Pico plan is enough for basic projects. If you're expecting close to 100 simultaneous players, consider upgrading to a Premier or Premator plan.
The HUB server: This is the server players connect to, from which they can access your various other servers (typically via portals). For basic projects, a Premier plan is recommended for the HUB, but again, depending on the number of players, you might want to upgrade to Premator.
Your main game server: This is the primary gameplay server that players can access from the HUB. In our example, this would be the PVP server where players battle. The recommended plan varies greatly depending on the server’s content: for PVP with dozens of players, you might choose Premator or Flexi. For a minigame like Spleef, a PicoThor might be sufficient, etc.
Your additional game servers: These are all the other servers that make up your network. As before, the hosting plan should depend on the features of each server.
For this example, we’ll use four servers:
- One server for BungeeCord
- One server for the HUB
- One server for the PVP server
- One server for the mining map
Once you have your servers, the next step is to install BungeeCord.
2.1 - Enabling BungeeCord Mode
To install BungeeCord, the first step is to enable BungeeCord mode on your BungeeCord server.
To do this, log into MineStrator and, from your list of servers, click on the Manage this server button for your BungeeCord server. This will take you to the management interface of your BungeeCord server.
Next, click on the Settings tab to access the server configuration options and check the BungeeCord mode checkbox.
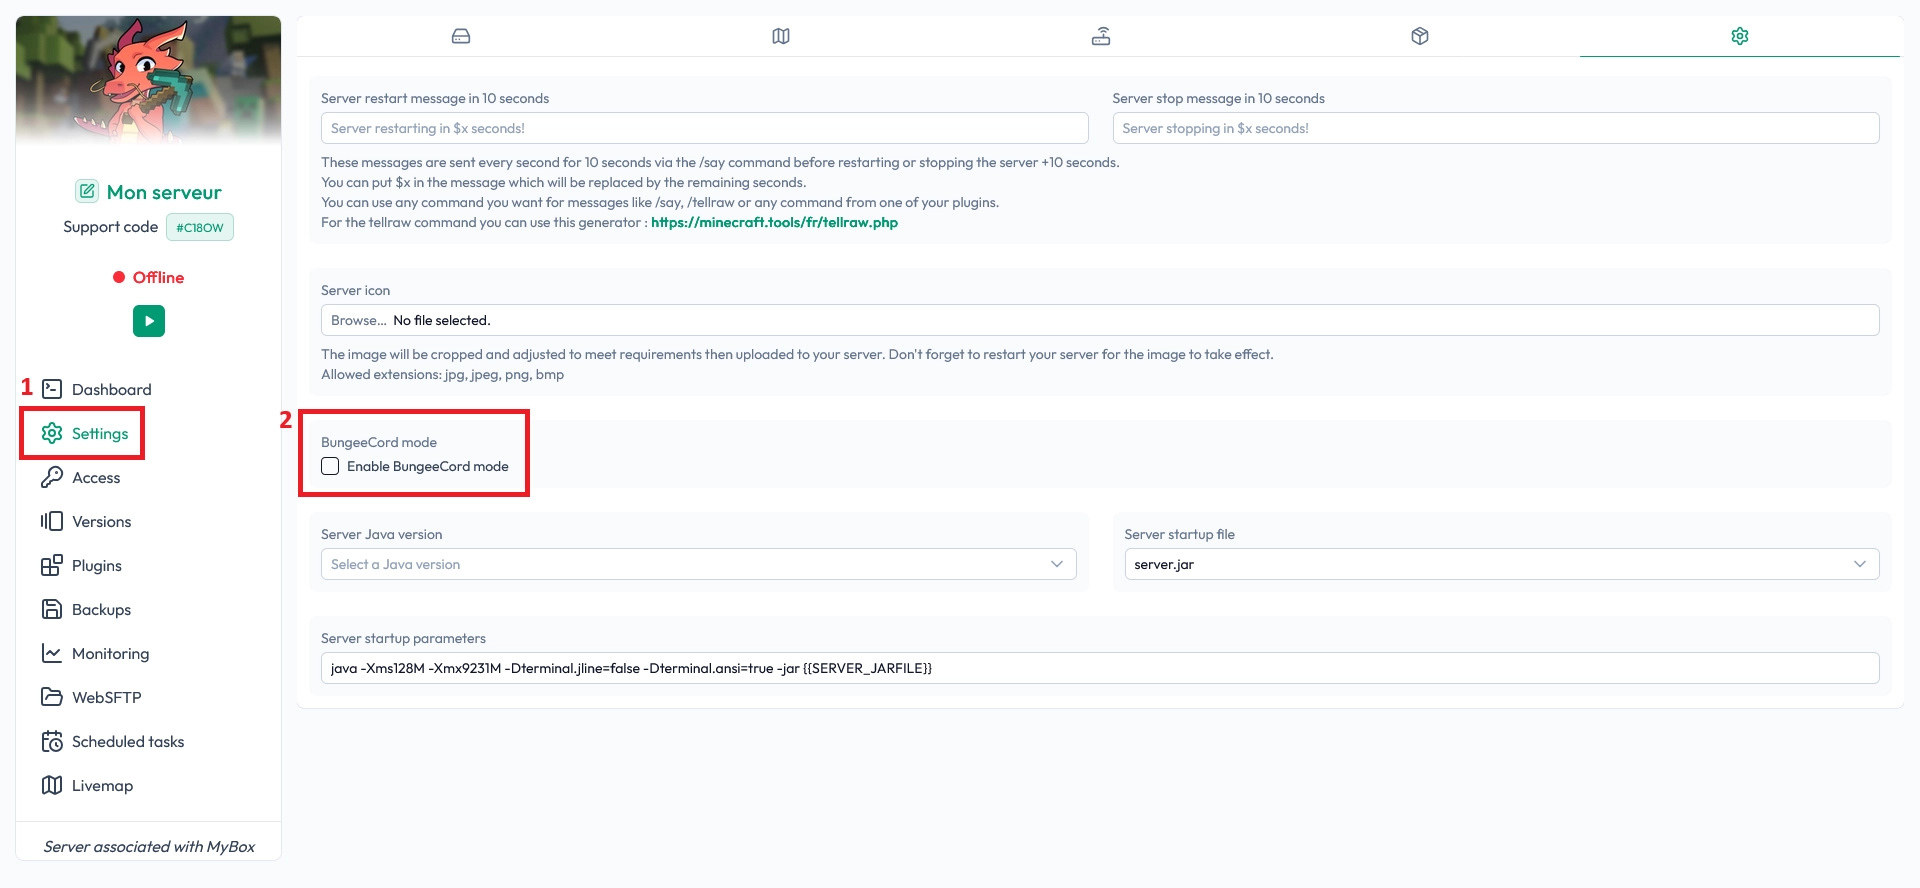
A BungeeCord server operates differently from a standard server, so this step is essential to ensure that your BungeeCord server functions correctly.
2.2 - Installing BungeeCord
Now that the server is configured, it's time to install BungeeCord.
From the management interface of your BungeeCord server, click on the Version tab, then select the BungeeCord tab and install the desired version.
Wait a few moments for the installation to complete, then start the server.
For the next step (configuration), prepare an SFTP connection to your BungeeCord server.
In my example, on my Pico server, I enabled BungeeCord mode using the Manage advanced options button.
Then I installed BungeeCord via the Change version button. Finally, I started the server, and it is now up and running.
3 - Installing the Other Servers
The other servers—your HUB and game servers—are standard servers that can be installed automatically using the Change Version button, or manually via OpenMod (you can find a tutorial on OpenMod by clicking here).
These are your game servers, where you will add your plugins, mods, configurations, etc.
Go ahead and set them up as needed (Spigot, Forge, etc.), install your plugins and mods, then start the servers.
For the next step, connect to each of your servers via SFTP to proceed with the configuration.
In my example, I installed Spigot for the HUB server and the PVP server. For the mining map server, I used a Vanilla server because I don’t want to use plugins on that one.
4 - Configuring Your Servers
The next step is to configure your servers.
A BungeeCord network operates on a "Master/Slave" principle: the BungeeCord server is the Master, serving as the central point through which the Slave servers communicate.
Additionally, it is the BungeeCord server that determines whether your network allows cracked Minecraft clients or not.
4.1 Configuring the "Slave" Servers
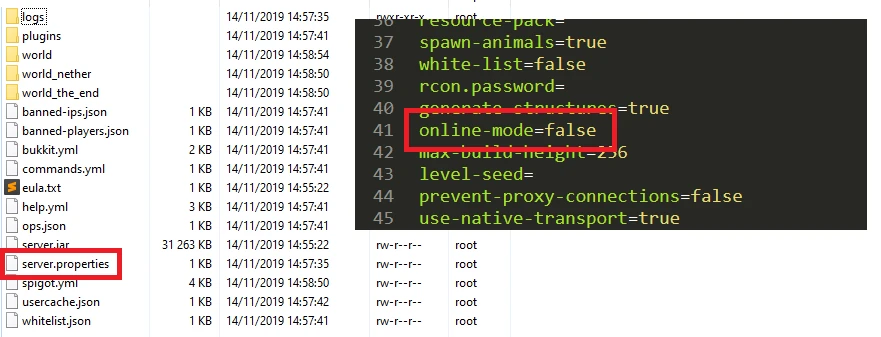
To allow BungeeCord to properly manage the various connections, you need to modify the server.properties file located at the root of each server.
Connect via SFTP, open the file, and find the line "online-mode" and change it to "false".
The BungeeCord server will handle authentication (including whether to allow cracked clients), but it is absolutely necessary to make this change on all other servers in the network to allow BungeeCord to link them properly.
This step must be repeated on every server in your BungeeCord network except the BungeeCord server itself.
Next, each Minecraft server version may have additional configuration settings to adjust.
Here’s an example with Spigot/PaperSpigot. For other server types, feel free to explore their configuration files to check for any BungeeCord-related options, and let me know if you’d like help identifying them.
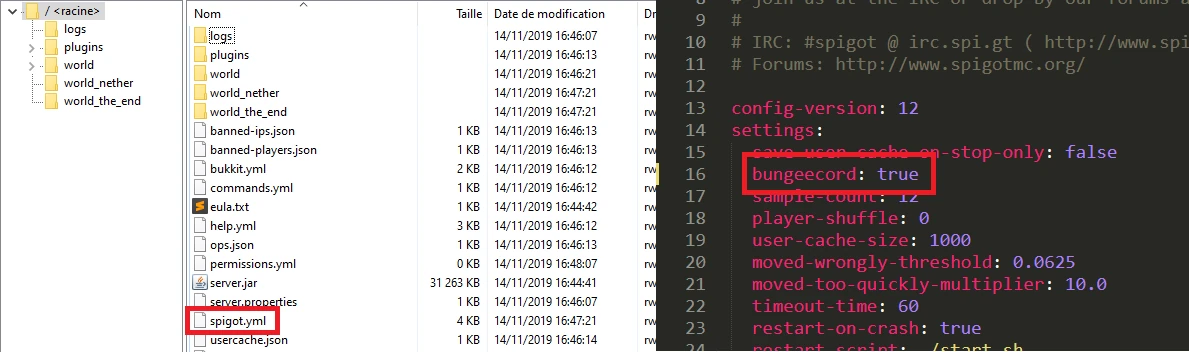
For Spigot/PaperSpigot servers: still using SFTP, go to the file spigot.yml, located at the root of the server (in the same place as the server.properties file).
Find the line bungeecord and set it to: bungeecord: true
Another example is with Sponge. In Sponge's configuration file, there's a setting related to IP forwarding (I'll explain what that is below) that also needs to be set to true.
Feel free to look into the documentation of other server platforms to find out which settings need to be changed for BungeeCord to work properly.
This step must also be repeated on all Spigot or other servers in your BungeeCord network, except for the BungeeCord server itself.
Don't forget to restart your servers to apply the changes!
In my example, here’s what I did:
On the SFTP of the HUB server: I edited the spigot.yml file and set the bungeecord variable to true
On the SFTP of the PVP server: I did the same—set bungeecord to true in spigot.yml
I didn’t change anything on the mining map server since it’s a Vanilla server
4.2 - Configuring the BungeeCord Server
The BungeeCord server is configured by editing the config.yml file located at the root of your BungeeCord server.
Start by adjusting the following key settings:
online_mode: Set this to false if you want to allow cracked clients to join your servers. If not, leave it set to true.
max_players: Set this to the maximum number of players you want to allow across your server network.
ip_forward: Set this to true. This allows the player’s real IP address to be passed between servers, which is essential for plugins that depend on IP (like logging or authentication plugins for cracked clients).
log_pings: Set this to false. While optional, this helps reduce spam in your console by disabling BungeeCord’s ping, log, and stat messages.
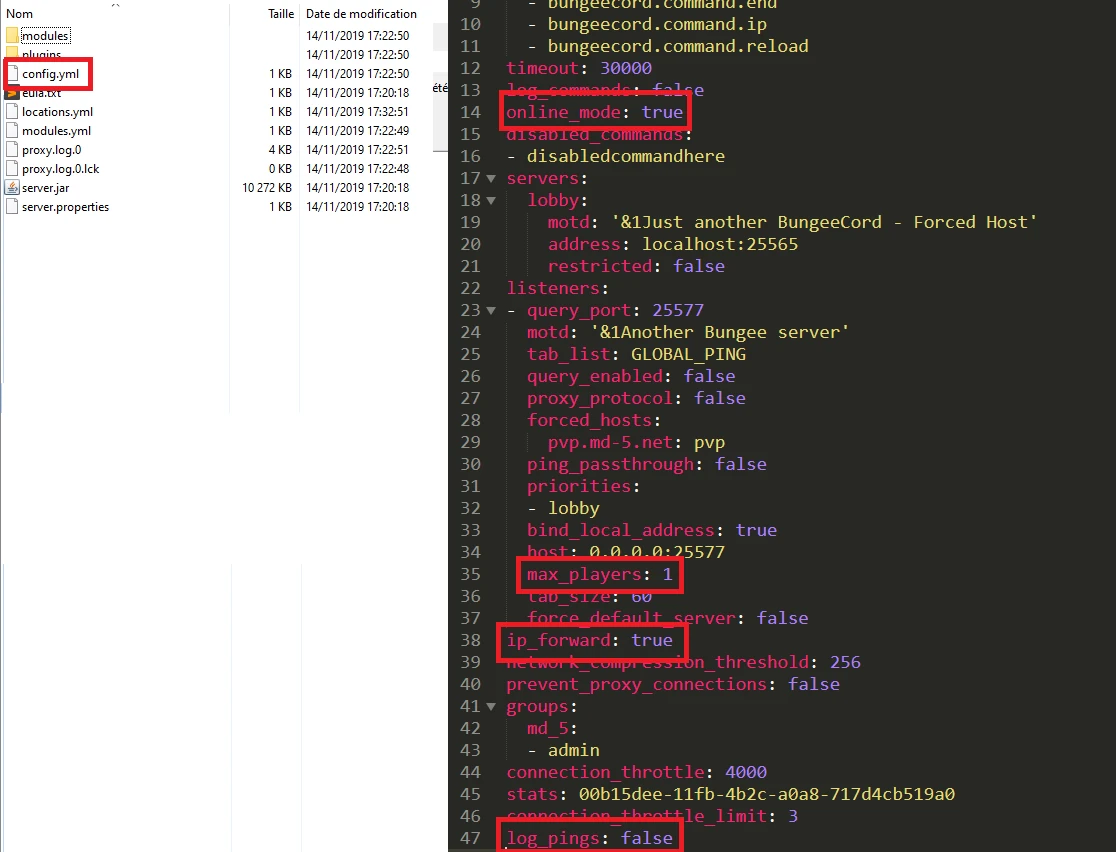
Once these changes have been made, restart the server to apply them and move on to the next step in the configuration.
After the restart, close the config.yml file you previously opened, then reopen it.
You’ll notice that some fields were automatically modified by the server, and others may have been rearranged. What we’re interested in now is located near the bottom of the file, this is the servers section.
This is where you'll enter the necessary information to link your servers together.
Each server must have a unique name, which will allow it to be easily identified in-game. In my example, I’ve used hub, pvp, and minage.
The address value refers to the IP of your MineStrator server (this can be either the numeric IP or the domain-style IP).
Be very careful to respect the indentation (the spacing before the start of certain lines), as improper formatting can cause errors.
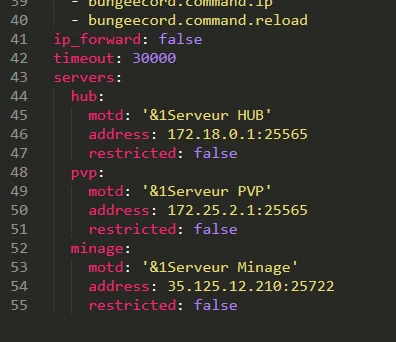
For my example, I modified all the configuration files as shown in the screenshots above. I now have a BungeeCord server that does not allow cracked clients, and it connects three servers: the hub server running PaperSpigot with the IP 172.18.0.1:25565, the pvp server also on PaperSpigot with the IP 172.25.2.1:25565, and the minage server running Vanilla with the IP 35.125.12.210:25722.
Once all your servers are correctly listed, save the file and restart your BungeeCord server. If the startup is successful, you should be able to launch Minecraft and connect to your HUB.
To connect in Minecraft, use the IP of your BungeeCord server. All other IPs have been disabled by BungeeCord and won’t work directly.
Make sure to validate the structure of your configuration files before saving them, using a YML validator like http://www.yamllint.com/.
5 - Verifying that your servers work correctly in Minecraft
Once you're connected to Minecraft using your BungeeCord server’s IP, you should spawn on the HUB server — the first one listed in your BungeeCord config file. To check that everything is working, you can use two in-game commands:
/server: displays which server you’re currently on and shows the list of available servers.
/server
That’s the end of this tutorial!
Again, this guide only covers the basic setup of a BungeeCord network. You can further customize each server with plugins like teleportation portals for your HUB, or content-adding mods.
Feel free to check out the official wiki for more detailed info about BungeeCord:
👉 https://www.spigotmc.org/wiki/bungeecord/
Also, we recommend installing a security plugin like BungeeGuard to add an extra layer of protection to your setup.
And of course, we’re always available on the MineStrator Discord if you need help.
Have fun!

 Enjoy 10% off your first month of server with MineStrator using the code ACTU10!